Showing posts with label sewing. Show all posts

Tuesday, December 20, 2011

Christmas sewing projects

 I tried to cut back on the Christmas gift projects this year, but couldn't resist a little bit of homemade for each of my kids.  Both of these projects were created from fabric I had just sitting around.  I love shopping in my bin of leftovers.

For our 18 month old I sewed this portable doll bed.  I took the general idea from One-Yard Wonders "Baby-doll Carrier," but I modified it a bit and added a blanket.  The interior was cut from a soft and cozy changing pad cover we hadn't used in years.  She's been playing with dolls a lot lately and this will be a nice size for her.

The older kids had colds over Thanksgiving weekend and my mom gave them each a travel pack of tissues to carry around.  They were really excited about having their own Kleenex.  I thought a reusable tissue carrier would be something they'd both be happy to see. 

I found an online tutorial for boogie monsters and had to make them!  These little monsters use very little fabric and are very quick to sew.  I used a bow tutorial on the same website to make a little bow for the girly monster.  I think I'll add a key ring to one of the ear loops on each monster, so that the pouches can be attached to a bag, but it looked too much like they each had one earring.  So we'll wait for them to be unwrapped for that final touch.


Monday, October 31, 2011

Handmade handed down

Last week I organized my youngest daughter's dresser.  I pulled out all the 12 month clothes and replaced them with the 18 month hand me downs.  In the bin was the first Baby Surprise Jacket that I knit.  That was my big transition from knowing how to knit to being a person who knit things.  That yarn worked so well with the pattern and now C's been wearing it a few times a week.

I also found space in storage for the clothes my older kids outgrew over the summer.  My son was helping me sort and was very excited to find the doll carrier I had originally made for R.  He doesn't often play with dolls, but occasionally he'll stroll one around or want to have one to play with if that is what the girls are doing.
It's great to see both of these handmade treasures getting a little more use.

Friday, September 9, 2011

Dance bag!

 My daughter just started dance classes on Tuesday at a studio in our town.  I was thinking about how our week would go, what we'd need to have ready each day, and made a note that we'd have to find a bag to bring her tap and ballet shoes to class.

I was going to throw them in a tote bag we have, but then started thinking about how it would be nice if there were room for her street clothes to fit while she was in class.  And parents don't stick around during class, so I wanted something she'd notice as her own so that she'd find her stuff.  Of course, as I thought about how she's a first grader now, doing stuff on her own, I wanted it to be cute and have room to grow.  It didn't take long for me to pull down my Sew What! Bags book!
I used the City Satchel pattern and the measurements listed in the book.  The whole bag was made from fabric scraps.  The dark blue fabric is heavy and cut from a curtain we had used in an apartment a few years ago.  The dragonfly material was scavenged from an apron I'd been meaning to finish for about 4 years.  The pocket on the flap was really the apron pocket!  The lining of the bag was cut from a twin sheet my mom gave me for sewing projects.  I did purchase a zipper and some fusible interfacing.

I like having this bag book as a reference on my shelf and have used in in quite a few projects now.  It gives me just enough guidance to quickly create the bag I need, but it also gives a lot of room for creative touches. 

I spent a really long time figuring out this water bottle pocket with elastic. Too long, probably, but I did not want to let it go.

I created the bag with an adult length shoulder strap, but then tacked it down to size.  I hope she enjoys the bag enough that in a few years I can lengthen and re-tack as needed.

The bag pattern suggested pockets on the back of the bag and on the bag front under the flap.  I put a row of 3 pockets on the inside instead.  I also added a zipper pocket inside for any really important things.  Making little interior zipper pockets is a small bit of sewing magic.  (I used two links for guidance, zipper1 and zipper2.)
I am always excited to use this dot fabric.  The dots are spaced in rows that are an inch apart.  Cutting and sewing is a breeze when you can just pick a row of dots to follow! 

Wednesday, July 6, 2011

July!

I really like July's addition to the Calendar of the Month Club!  I smile each time I look at it. (June's calendar was a blue whale that I put together so poorly that I don't think I even took a photo!) Our June was busy with travels and we're looking forward to finding more adventure to fill the rest of the summer.

I haven't spent much time crafting this summer, but here are the projects that I did finish in the last few months.


Little Blue Birds from Itty-Bitty Toys
I had intended these little birdies as Easter gifts and was just a few weeks late.  They each fold into an egg!  The kids were very excited (the pattern was one that my daughter had pointed out when she looked through the book.)  It is a little difficult to get the birds folded in to the eggs and I wonder how many times they can be folded without damage.  (Ravelry: Blue birds)

I used another Susan B Anderson pattern to make a birdie for the baby.  I think she has such great patterns and this one is free! (Duck-to-bunny pattern) He is quite well loved!  (You can see the bunny side at my Ravelry link: Duck/Bunny)

Mini-totes from sew what! bags
I created these mini-tote bags for gift bags to fill with little treasures.  Both were made from fabric scraps and measure about 10" x 10".  The sew what! book is always inspiring because it outlines the pattern, but leaves a lot of room for creativity.  Every time I make one I think of so many other bag ideas I'd love to try.


These are super soft and squishy slippers.  I modified the pattern to fit a larger size and outlined those changes on my Ravelry page. (Nola slippers)  My brother was severely injured by a drunk driver a few months ago and I spent an anxious weekend knitting these and waiting for updates.  My husband was out of town for work and so I wandered around after the kids with my yarn under my arm and knit like each garter stitch held all of my hopes and prayers for his recovery.  Knitting is nice like that.  (My brother is recovering very well, considering, but has a long road still.)

Right now I'm working on a dress for the baby who is no longer really a baby...

Monday, January 10, 2011

Handmade Christmas gifts - part 1

I enjoy making lots of gifts for the holidays. My to-do list seems to grow and grow and I always run out of time in the end. I'm still working on one of the baby's gifts. At least she's too young to know!

In my first handmade gift post I'll talk about the items I sewed. There is something so satisfying about sitting down and sewing together a gift in a night or two!

Here is the robe I made for my son's 3rd birthday. I used the same pattern to make a robe for my daughter when she turned 3. (Burda 9690) The outside is fleece and the lining is lizard print flannel. I really enjoy this pattern - it is very simple and quick.


I made our baby girl a ribbon blanket. The puppy fabric is very soft flannel. The pink square is one of the scarves I dyed. I sandwiched ribbon loops of 4 different types and heights between the front and back. This projected turned out just as I had hoped and I'm so happy with it!

Here she is enjoying it!

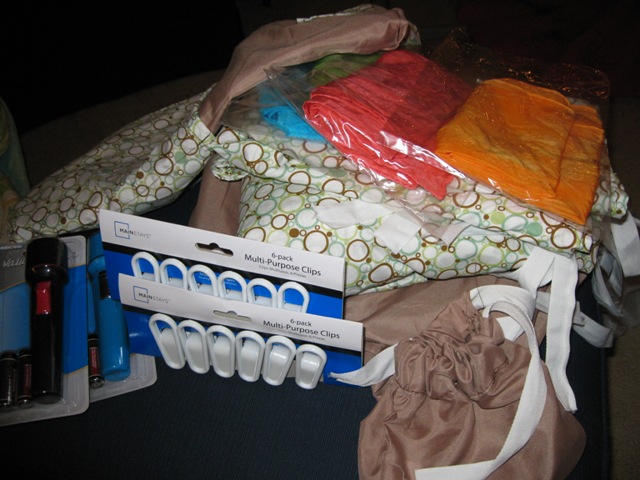
Last year I came across a make-your-own fort kit tutorial. I was excited to put it together this year for some friends of ours with 3 (now 4) kids.

These pictures are really dark. That is what happens when you finish the project and want to box it up right away so that it arrives on time.
I purchased two sets of twin sheets on Black Friday and attached 6 ties to each sheet. (One in each corner and one on the middle of each long side.) I found by-the-yard twill tape for the ties and used 2 yards for each sheet. The exception was one of the fitted sheets. I tried sewing a pocket into each corner and left off the ties on the long edges. The sheets are on the bottom of the pile on the right side of the picture above.

I used the pillowcases to make two bags. A large bag with big pockets on the front and back to hold the whole kit and a smaller draw string bag for the white clips. I included 4 of the scarves I dyed, the clothespin-like clips, and 3 flashlights.
This was another project that was so fun to put together. I plan to make more of these for gifts in the future!

Wednesday, May 19, 2010

Needle roll

I put together two knitting needle rolls this spring. The fun thing about making two was that I could make some extra modifications to the 2nd so that it was even closer to what I had intended.

The fabric from this project is from the Crafty Planet. I love their selection and browsing for a while always puts me in a creative mood.

I used these tutorials from Multicrafty and Alexandra's Knits as a jumping off point and then modified things a little as I went.

I found a really helpful guide to welt pockets at Fashion Incubator and it was fun to try getting that to work.


With some fabric scraps I had sitting around I also put together this small, travel case for just a few pairs of circular needles.

Friday, February 19, 2010

In the works...

I have several projects in various stages these days.

Here is R's Wallaby - I'm just about ready for the first stripe of the white yarn.

Over the weekend we visited our families in MN and I checked out Crafty Planet in Minneapolis. It's an independent shop with some beautiful fabric and yarn. The fabric designs are unique and I just want to start sewing all sorts of things. The material I bought seems softer and thicker than I would expect. I wonder where it would have been shelved in one of the big box fabric stores. This is intended for a quick little knitting needle storage project.
And I do want to sew my perfect diaper bag before baby #3 arrives. I like messenger bag styles with lots of pockets and I'm thinking about a removable smaller bag for just a diaper, wipes, and J's Epi-pens - for those times I don't want the big bag. So, this is in the pondering stage right now.

Thursday, December 10, 2009

Small sewing projects

I made two little projects for my son's birthday.

A simple apron - with Velcro at the neck and a pocket for his important tools. I made my own pattern after browsing around the internet for a while.

A car pillow with some of his favorite things on it. It's a simple envelope style pillow casing, again easy to figure out after some internet reading.

Sunday, July 26, 2009

Bags!

I've been procrastinating a bit in packing for my upcoming move by finishing up little sewing projects I have sitting around. I've also found excuses to create a few new projects as well.

I created these bags in recent weeks. All three were created using guidelines from the SewWhat! Bags book. The thing I really enjoy about this book is that it outlines directions for 18 bags which form a starting point for any number of projects.

The first bag is a small clutch that I will use as a purse, although right now it is working well as a bag for my sewing tools. I made this as a demonstration piece for some friends who had planned to get together for a sewing night.

That fell through, but I had already cut out my fabric for a 2nd bag that I would have made during sewing night. It's bigger - close to 14 inches square I think. I plan for to be a shopping bag or to hold odds and ends when I travel. It's canvas on the outside and polka-dot cotton on the inside.

Finally, I attended a baby shower last night and we were all asked to bring a frozen meal for the mom. I brought muffins and bread and wanted to put a personal spin on the gift. I was able to quickly put together this sling bag. The book mentions that it was originally designed to hold your clothes pins while you are hanging out clothes and it is also featured on the book cover. I had a hard time giving it away. It has a drawstring and 3 pockets in the denim fabric along the bottom. I can see myself making a few more of these down the line!
All of these bags were made from fabrics I had just sitting around. I just purchased the two zippers. They were all one-night projects that were very easy to put together.

Wednesday, May 6, 2009

Boutique sale update

I had mixed luck at the consignment and boutique sale last weekend. Most of the used toys and clothes I put into the consignment section sold, which is always nice, and I had fun seeing some of my friends on the first night of the sale, which was set aside for consignors only.

I sold 5 of the sets of eggs and one carrier, although a friend of mine bought the carrier and I totally would have made one at cost for her so I am feeling a little guilty about that. For future sales I'll probably make up some more eggs, but not the larger items.

However, it was a good experience because it proves the point that I can't earn even half the same income making toys as I do at my part time job. If I had kept the prices at what I originally intended perhaps things would have sold, but I would not have the time to open a web shop and continue to produce merchandise at that rate.

But this also means that I can make these things for people when I want to and I don't have to worry about making enough profit on them to be worth my time. I hate trying to put a price on things that I'm making for people I know!

Friday, May 1, 2009

Sarah Monkey Designs

This weekend is the consignment and boutique sale that I think I mentioned earlier. It is run by a friend of mine and she encouraged me to make a few items to sell. It came down to the wire last night, but I finished the small number of things I hoped I could get done in a month. I'm curious to see if they will sell and if they will sell at the prices that my friend recommended.

I continued to mull over the choices for my "company" name and when it came time to register I planned to take another suggestion from my friend and just add the word Designs after my name, nice and simple. In the end I decided that a little anonymity wouldn't hurt until I decided if I'm going to pursue this any further.

After creating my items, I also had fun coming up with a general design scheme for some product tags. Sarah Monkey Designs looks a lot more put together now that everything is tagged and ready to go!

For this sale I put together a few aprons, fleece eggs, and doll carriers.

Two of the aprons were a smock style like this one I made as a gift for M.G. a couple years ago.
I sewed up one half apron, mostly to try an idea I came across elsewhere - putting a tab of Velcro on the side so that it would be easy for a child to fasten it after an adult helped them tie it the first time. I didn't have a chance to take a picture of that feature, but the Velcro fastener is right where the tie meets the front waistband in this picture.

I came up with the idea for these fleece eggs after being unable to find anything similar for a price I was willing to pay. They are each about 2 inches wide, 2.75 inches long and fit perfectly into a toy frying pan. I package them in Easter egg shells and M.G. plays with them all the time. I've given a few to friends who also find them popular.

Here is the doll carrier that I designed for M.G.'s birthday. I'm going to try to sell 3 of them this weekend. She always wanted her doll in a carrier when I carried her brother on my back and I got tired of tying blankets around her. It has Velcro at the waist and on the chest clip for adjustable sizing and can be worn in front or back. Padded straps and a pocket make it just like Mama's.
Here is a photo of M.G. using the carrier I made for her. She tells me that it is so much easier to help bake when your baby can be near you all the time!

Feel free to comment or email me if you have questions about any of these designs. I'd be happy to share the instructions or make a few more items to sell. I'd be happy to write a tutorial for the carrier or eggs at some point.