Showing posts with label finished projects. Show all posts

Monday, June 18, 2012

Baby doll

 I knit this doll for C's 2nd birthday.  It was originally going to be a Christmas gift, but I ran very short on time.  Of course I was up late the night before her birthday finishing up.

The pattern was from Itty Bitty Toys.  I've made several things from the book and they usually turn out well.  One handy rule for these patterns is that the author suggests sewing the parts together as you go.  So instead of a pile of pieces that need to be assembled at the end, the head is sewn to the body right away.  Then the arms are added and so on - makes the whole process seem faster.

The pattern suggests using poly pellets to add weight to the body, hands, and feet.  I was worried about the small beads escaping from the hands and feet, so I used only stuffing there.  In the body I sewed pellets into a fabric bag.  They give the body a nice weight. 

I watched several of the designer's online tutorials for tips on the face embroidery and that whole step went faster than I expected.

I'm not sure what mistake I made, but I don't like how the stuffing shows in through gaps in the knitting - I wonder if that was a poor yarn or needle choice.

I think the doll is cute and huggable.  C on the other hand, isn't a fan at this point.  She pulled it out of the bag on her birthday and handed it directly to me.  She has refused to take it since then.  We've been on vacation for a week, so maybe tomorrow I'll set it out and see if she is curious.

Ravelry link with yarn, pattern, and needle details: Catie's Doll

Tuesday, January 31, 2012

Christmas 2011 - Knitting

I didn't knit very many gifts this year, but enjoyed the things I did make.

My first project was actually a birthday gift for my brother.  It's the Dwarven Battle Bonnet. I had found this pattern a few years ago and was just waiting for the perfect reason to make it. 
I used Patons classic wool and modified the pattern just a bit based on the other Ravelry projects.  It was very fun and quick to make.  I was worried about felting it the proper amount in my front loading washing machine.  In the end, the hat seemed a little loose, but I didn't want to over felt the yarn.  (Ravelry link: Viking helmet hat)

This Darkside Cowl was a free pattern and I knit it in superwash for my daughter's teacher.  I liked all the colors that pop out of this colorway (Rainier, Cascade Superwash 220).  If I were to wear it I'd probably use it as a headband/ear warmer, but it did fit snugly around my neck too.

I made two pairs of slippers for gifts this year.  A pair of the NOLA slippers for my father in law (which I finished on Christmas Eve, so I didn't get a chance to take a photo before wrapping them!) and these French Press Slippers for my sister-in-law.

I enjoy the squishy feel of the NOLA slippers and the pattern changes enough to keep things interesting.

The French Press Slippers were my Thanksgiving weekend project.  I knit most of them in the car going to and from Minnesota.  The yarn is colorway Dragon Dance in Patons classic.  (Ravelry: Dragon Dance)


Sunday, January 15, 2012

Christmas ornaments 2011

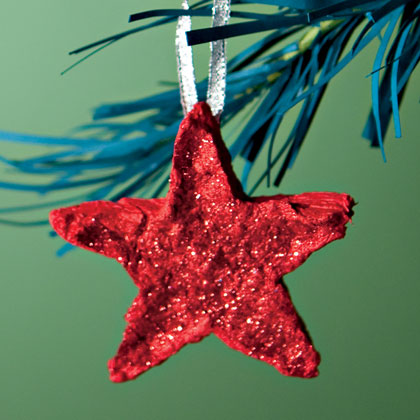
image from familyfun.go.com
For several years the kids have been making Christmas ornaments as their gift to Grandparents and other special adults.  My oldest daughter and I picked out kits from the craft store in previous years and last year her brother was old enough to help too.

Nothing was looking right to me this year until I came across this tutorial for paper stars.

We all had fun creating these and the kids could help all along the way.  All three tore up the construction paper and put it in the blender.  I added the hot water and operated the blender.

They took turns helping me press the water out of the paper pulp, through the sieve.  Then they took turns scooping the pulp into the cookie cutter and pressing it into place.  (I was quality control and made sure the cookie cutter was filled completely.) 

I pressed out as much water as I could before they took turns with the glitter. 


We made three batches - all red, all yellow, and a couple sheets of yellow combined one sheet of red to make orange. 

The stars took much longer to dry than expected.  At least 3 hours and I flipped them over at one point.  I probably could have pressed more water out before transferring them to the pan.  We glued loops of silver ribbon for hanging.

Tuesday, December 20, 2011

Christmas sewing projects

 I tried to cut back on the Christmas gift projects this year, but couldn't resist a little bit of homemade for each of my kids.  Both of these projects were created from fabric I had just sitting around.  I love shopping in my bin of leftovers.

For our 18 month old I sewed this portable doll bed.  I took the general idea from One-Yard Wonders "Baby-doll Carrier," but I modified it a bit and added a blanket.  The interior was cut from a soft and cozy changing pad cover we hadn't used in years.  She's been playing with dolls a lot lately and this will be a nice size for her.

The older kids had colds over Thanksgiving weekend and my mom gave them each a travel pack of tissues to carry around.  They were really excited about having their own Kleenex.  I thought a reusable tissue carrier would be something they'd both be happy to see. 

I found an online tutorial for boogie monsters and had to make them!  These little monsters use very little fabric and are very quick to sew.  I used a bow tutorial on the same website to make a little bow for the girly monster.  I think I'll add a key ring to one of the ear loops on each monster, so that the pouches can be attached to a bag, but it looked too much like they each had one earring.  So we'll wait for them to be unwrapped for that final touch.


Saturday, December 17, 2011

Banquette

Our most recent home project was building a banquette for our kitchen table.  We don't have much extra room in the dining space of our kitchen and our new table was just a little wide for the area.  With small kids, I really felt a bench would give a lot of seating versatility and without chairs to slide out we could put the table that much closer to the wall.  I also wanted something sturdy that would not be sliding around or tipping over.


To build the banquette we purchased 3 finished hickory cabinets. Two 30" x 15" for the long side and one 36" x 15" for the short side.

We used a glued pine board (16" wide) for the bench.  After cutting the two pieces we glued them together and added a block under the seam to give it some extra support.  We rounded the edges a bit when sanding and then gave it a couple coats of stain and three coats of polyurethane.

To bring up the seating height we made a riser out of 1"x2" pine and finished it to match the rest of the banquette.


The cabinets are attached the the wall and at this point the bench is just sitting on the top.  We might attach it if it wobbles too much.


Our goal was to have the bench in place for J's birthday party last weekend.  We were able to comfortably seat 3 adults and 2 kids in the space where only 3 chairs would have fit.  Plus the table was close enough to the wall that the chairs on the other side could be fully pulled back from the table.


Normally we don't have a leaf in the table and its length matches the banquette.  But for parties we can put in both leaves, use all the chairs, and seat quite a few people!


Tuesday, September 27, 2011

Quick baby shower knit

I was recently invited to a baby shower and decided at the last minute to make a little hand knit as a part of my gift to the new mom.

I found this free pattern (Sweetie Pie Kit) on the Pickles website.  I'm drawn to so many of their patterns and I am sure the very cute babies in their photos helps.

This little dress and hat use the fisherman's rib.  It took me quite a while to feel comfortable with this stitch pattern, but it produces a squishy final product with lots of stretch.

I found a new yarn for this project.  Plymouth Yarn Baby Boutique is microfiber and nylon.  It has a very soft texture, a little stretch, and is machine washable.  I think the new baby will be cozy this winter with this dress over a long sleeve shirt and leggings.

Friday, September 9, 2011

Dance bag!

 My daughter just started dance classes on Tuesday at a studio in our town.  I was thinking about how our week would go, what we'd need to have ready each day, and made a note that we'd have to find a bag to bring her tap and ballet shoes to class.

I was going to throw them in a tote bag we have, but then started thinking about how it would be nice if there were room for her street clothes to fit while she was in class.  And parents don't stick around during class, so I wanted something she'd notice as her own so that she'd find her stuff.  Of course, as I thought about how she's a first grader now, doing stuff on her own, I wanted it to be cute and have room to grow.  It didn't take long for me to pull down my Sew What! Bags book!
I used the City Satchel pattern and the measurements listed in the book.  The whole bag was made from fabric scraps.  The dark blue fabric is heavy and cut from a curtain we had used in an apartment a few years ago.  The dragonfly material was scavenged from an apron I'd been meaning to finish for about 4 years.  The pocket on the flap was really the apron pocket!  The lining of the bag was cut from a twin sheet my mom gave me for sewing projects.  I did purchase a zipper and some fusible interfacing.

I like having this bag book as a reference on my shelf and have used in in quite a few projects now.  It gives me just enough guidance to quickly create the bag I need, but it also gives a lot of room for creative touches. 

I spent a really long time figuring out this water bottle pocket with elastic. Too long, probably, but I did not want to let it go.

I created the bag with an adult length shoulder strap, but then tacked it down to size.  I hope she enjoys the bag enough that in a few years I can lengthen and re-tack as needed.

The bag pattern suggested pockets on the back of the bag and on the bag front under the flap.  I put a row of 3 pockets on the inside instead.  I also added a zipper pocket inside for any really important things.  Making little interior zipper pockets is a small bit of sewing magic.  (I used two links for guidance, zipper1 and zipper2.)
I am always excited to use this dot fabric.  The dots are spaced in rows that are an inch apart.  Cutting and sewing is a breeze when you can just pick a row of dots to follow! 

Wednesday, August 31, 2011

Rainbow dress


I had purchased some dark blue DK yarn when I was pregnant and thought I'd make something for the baby once I knew if we were having a boy or girl.  For months and months I did not get to it, but always had a cute diaper cover/skirt in mind once we she was born.  I also was planning to knit a lacy dress for the baby's first birthday.

Eventually I started looking though patterns, but the skirts just weren't clicking.  I was going to put the blue yarn toward the birthday dress, but its style was not very practical for a toddler on the go.  Eventually, I found this adorable dress pattern and it met all of my criteria!  I didn't want a solid dark blue dress, so I picked out some rainbow yarn and a lighter blue shade as well.

I cast on back in April or May, but life got in the way and I just had a light blue collar for the longest time.  Baby's birthday came and went and so this dress fell farther down my priority list.  It became my car knitting project and it is a good thing we had lots of road trips planned this summer.  I knit all the way to the East Coat and back.  Then I knit to the Grandparents' houses and to Colorado too.

But, now it is finished and looks twirly cute on her.  I followed the pattern for the 1-2T size, except for a few modifications.  I used ribbing at the waist instead of the drawstring.  I shortened the sleeves and used the ruffle edge instead of ribbing there.  I used a simple texture stitch on the front of the top.  (K3,P1 for one row, then 3 rows of stockinette, then a row of K1, *P1, K3*, then 3 more rows of stockinette... repeat...)
 (summer dress on Ravelry)

However, once I got going, the dark blue yarn just didn't fit in....  maybe a little hat for when the weather gets cold?


Friday, August 19, 2011

Little Pink Pig!

I put the finishing touches on this little pink pig this week and mailed him off as a birthday present for one of our favorite 3 year olds.  This pig is quite cute and is knit around a bouncy ball!  We just had to try him out a few times before popping him into his box and we were squealing with laughter as he jumped around the kitchen.  (Couldn't help that pun...)

A year or two ago we got a book called Ping Pong Pig.  It's all about a little pig who wants to fly and gets into trouble jumping all over the place.  His friends get him a trampoline to keep him busy, he uses it to fix all the stuff he broke, and everyone is happy.  We sent the pig and book together - a bouncy Ping Pong to go with the book!

The pattern I used for this pig was posted for free on the Spud and Chloe blog. (Oink)  There are a lot of fun, free patterns on that blog. 

I had a difficult time sending this little guy off.  He's a perfect handful and has a nice weight due to the bouncy ball.  Adorable!


(Ravelry: Bouncy Pig!)

Wednesday, July 6, 2011

July!

I really like July's addition to the Calendar of the Month Club!  I smile each time I look at it. (June's calendar was a blue whale that I put together so poorly that I don't think I even took a photo!) Our June was busy with travels and we're looking forward to finding more adventure to fill the rest of the summer.

I haven't spent much time crafting this summer, but here are the projects that I did finish in the last few months.


Little Blue Birds from Itty-Bitty Toys
I had intended these little birdies as Easter gifts and was just a few weeks late.  They each fold into an egg!  The kids were very excited (the pattern was one that my daughter had pointed out when she looked through the book.)  It is a little difficult to get the birds folded in to the eggs and I wonder how many times they can be folded without damage.  (Ravelry: Blue birds)

I used another Susan B Anderson pattern to make a birdie for the baby.  I think she has such great patterns and this one is free! (Duck-to-bunny pattern) He is quite well loved!  (You can see the bunny side at my Ravelry link: Duck/Bunny)

Mini-totes from sew what! bags
I created these mini-tote bags for gift bags to fill with little treasures.  Both were made from fabric scraps and measure about 10" x 10".  The sew what! book is always inspiring because it outlines the pattern, but leaves a lot of room for creativity.  Every time I make one I think of so many other bag ideas I'd love to try.


These are super soft and squishy slippers.  I modified the pattern to fit a larger size and outlined those changes on my Ravelry page. (Nola slippers)  My brother was severely injured by a drunk driver a few months ago and I spent an anxious weekend knitting these and waiting for updates.  My husband was out of town for work and so I wandered around after the kids with my yarn under my arm and knit like each garter stitch held all of my hopes and prayers for his recovery.  Knitting is nice like that.  (My brother is recovering very well, considering, but has a long road still.)

Right now I'm working on a dress for the baby who is no longer really a baby...

Wednesday, March 23, 2011

Aravis

Several months ago I won a new pattern from French Press Knits.  I've tried a couple of Melynda's patterns before and really liked the results.  The Aravis is an infinity cowl with a built in hood that used 1 skein of Malabrigo worsted.  I've been wanting to try Malabrigo for ages!

I really liked the feel of the yarn and its slight color variation.  I had not tried short rows before and enjoyed figuring that out while making the hood.  The whole project was quick and easy on size 10.5 needles. (Ravelry link: Burgundy Aravis)

This was my end result and it took me a while to figure out how to even put it on!

But it is soft and warm!  I'm not sure if I am a cowl person - I don't wear scarves often and am not sure I'd like it close to my neck like that.  Plus, my plan was to make this as a gift - I just need to figure out who I'm giving it to!

The hood is a cute touch!  And I think it would add just a bit of extra warmth on a cool day.

Friday, February 11, 2011

Handmade gifts - part 2

My list of gifts I wanted to knit just kept growing and growing this year.  I was trimming it continually, yet adding new things at the same time. 

I will include the Ravelry link for each of my projects.  If you are curious about yarn type, needle sizes, and other details you can find that information there. 

I had such a great time knitting this flap hat for J. (Free Ravelry pattern: Cozy Canuck Chullo)  I had not tried Fair Isle before and now I can't wait to try it again.  The first hat I made was too small, so I made another in a larger size and we gave the smaller hat to a baby friend.  (Ravelry: flap hat)

 R really likes the yarn I used to make her Wallaby and had requested matching mittens.  I held the yarn double and put a little heart on each.  I thought they might not keep her hands warm enough, but she has worn them outside a few times and they passed the test.  (Ravelry: mitts)

 I also knit these cute butterflies (free pattern) and attached them to ponytail holders for R.  I used the same yarn as in her Kina sweater (shown in the photo above.) (Ravelry: butterflies)

I wanted to make C a little baby sweater.  This pattern is called Little Boy Blue.  It's cozy and warm, but I don't like how much the collar and bottom edge roll.  I had intended to put I-cord along the bottom, but at this point probably won't.  I also knit her that squishy ball toy.  I had planned for a whole group of them, but ran out of time. I am almost finished with a second, slightly larger ball. (Ravelry: sweater, ball)

I decided to make R's teacher and student teacher each a scarf. The goal was to make both over our Thanksgiving vacation and I was successful.  I really like both of these patterns for quick gifts.

For the student teacher I knit a Breckenridge cowl.  This yarn was in my stash and worked well with the pattern - the cables show up much better in person. The dragonfly buttons were a last minute find and really went well with the yarn. (Ravelry: cowl)

And here is the Super-Fast, Ultra-Cozy scarf for R's teacher.  This is another free pattern and I know it is a popular pattern for gifts because it is so quick to knit.  I used Lion's Brand Homespun for this one and it turned out to be such a soft, squishy, warm scarf.  The pattern worked well with the unique texture of the yarn.  (Ravelry: SFUC scarf)

I found some gorgeous, soft alpaca yarn and wanted to make a scarf and hat for my mom. I think that this yarn was one of my favorites to knit with.  Each stitch was a new color and it felt very luxurious and dense.  The Diagonal Rib pattern (free) gave it a little texture.  I carefully immersed it in water before blocking it and it became much more open and limp.  I would have made it longer if I had known and I'm disappointed by how the pattern is no longer as striking.  It was still a cozy scarf, even with the negative surprises.  (Ravelry: alpaca scarf

I went with the free Snappy Hat pattern for a matching hat and it was off to a nice start.  Sadly, I ran out of yarn with 7 rows to go!  I need to find a new plan for this yarn, but I just adored the hat it was becoming. These photos also show how bulky the scarf would have looked before washing.  I have no idea what this yarn will become, but I need to find a good use for it!   (Ravelry: sad hat)

My latest project was for a new baby friend of ours who was born in early January.  It is the same free pattern I used for C's Welcome Home hat and booties.  I used the same supersoft yarn, but this time I knit it to the pattern specified size.  Baby gifts are so fun to knit!  (Ravelry: booties, baby hat)

Monday, January 10, 2011

Handmade Christmas gifts - part 1

I enjoy making lots of gifts for the holidays. My to-do list seems to grow and grow and I always run out of time in the end. I'm still working on one of the baby's gifts. At least she's too young to know!

In my first handmade gift post I'll talk about the items I sewed. There is something so satisfying about sitting down and sewing together a gift in a night or two!

Here is the robe I made for my son's 3rd birthday. I used the same pattern to make a robe for my daughter when she turned 3. (Burda 9690) The outside is fleece and the lining is lizard print flannel. I really enjoy this pattern - it is very simple and quick.


I made our baby girl a ribbon blanket. The puppy fabric is very soft flannel. The pink square is one of the scarves I dyed. I sandwiched ribbon loops of 4 different types and heights between the front and back. This projected turned out just as I had hoped and I'm so happy with it!

Here she is enjoying it!

Last year I came across a make-your-own fort kit tutorial. I was excited to put it together this year for some friends of ours with 3 (now 4) kids.

These pictures are really dark. That is what happens when you finish the project and want to box it up right away so that it arrives on time.
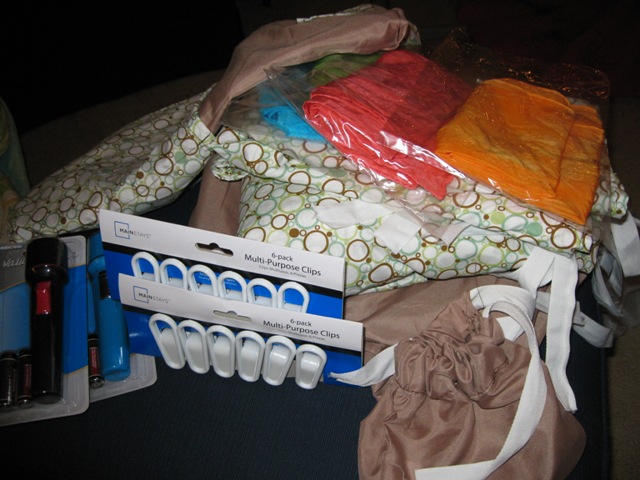
I purchased two sets of twin sheets on Black Friday and attached 6 ties to each sheet. (One in each corner and one on the middle of each long side.) I found by-the-yard twill tape for the ties and used 2 yards for each sheet. The exception was one of the fitted sheets. I tried sewing a pocket into each corner and left off the ties on the long edges. The sheets are on the bottom of the pile on the right side of the picture above.

I used the pillowcases to make two bags. A large bag with big pockets on the front and back to hold the whole kit and a smaller draw string bag for the white clips. I included 4 of the scarves I dyed, the clothespin-like clips, and 3 flashlights.
This was another project that was so fun to put together. I plan to make more of these for gifts in the future!