Showing posts with label internet finds. Show all posts

Sunday, January 15, 2012

Christmas ornaments 2011

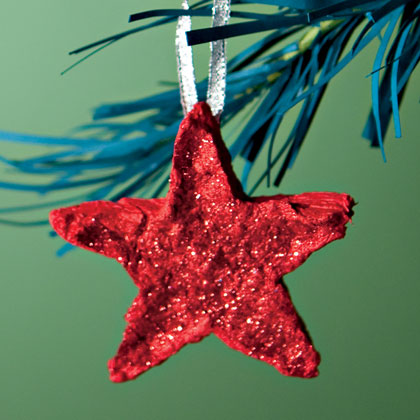
image from familyfun.go.com
For several years the kids have been making Christmas ornaments as their gift to Grandparents and other special adults.  My oldest daughter and I picked out kits from the craft store in previous years and last year her brother was old enough to help too.

Nothing was looking right to me this year until I came across this tutorial for paper stars.

We all had fun creating these and the kids could help all along the way.  All three tore up the construction paper and put it in the blender.  I added the hot water and operated the blender.

They took turns helping me press the water out of the paper pulp, through the sieve.  Then they took turns scooping the pulp into the cookie cutter and pressing it into place.  (I was quality control and made sure the cookie cutter was filled completely.) 

I pressed out as much water as I could before they took turns with the glitter. 


We made three batches - all red, all yellow, and a couple sheets of yellow combined one sheet of red to make orange. 

The stars took much longer to dry than expected.  At least 3 hours and I flipped them over at one point.  I probably could have pressed more water out before transferring them to the pan.  We glued loops of silver ribbon for hanging.

Thursday, January 5, 2012

Happy New Year!

Prosperity and happiness to you in the coming year! 


One of my favorite starts for gift and card making is to have the kids cover plain paper with paint.  In the past we've used water color, dot paint, or finger paint.  We've used this paper to cut flowers for mothers' day cards, wrap packages, and as elements of thank you cards.  I matted one of R's water color paintings with a page that J finger painted so that I have a little artwork from each on the wall.


I especially like adding this step when we're trying to incorporate work from a toddler or if we all want to be a part of a gift that is technically challenging for the kids.  We sent a flock of origami cranes to a loved one as a part of a birthday gift.  I cut the dry painted paper into squares and the kids helped me pick which squares we used and decided which side was the neck and which was the tail.

They all started with finger paint and white paper, but the finished product was so different for each.  Big blobs of color on white space for the youngest, fairly homogeneous mixed up color for the middle kid, and a little more variation how the colors worked together for the oldest.  A few birds even had little tiny finger prints captured on their wings.  


I used the video found here (Origami) to teach myself how to fold the cranes.

Tuesday, December 20, 2011

Christmas sewing projects

 I tried to cut back on the Christmas gift projects this year, but couldn't resist a little bit of homemade for each of my kids.  Both of these projects were created from fabric I had just sitting around.  I love shopping in my bin of leftovers.

For our 18 month old I sewed this portable doll bed.  I took the general idea from One-Yard Wonders "Baby-doll Carrier," but I modified it a bit and added a blanket.  The interior was cut from a soft and cozy changing pad cover we hadn't used in years.  She's been playing with dolls a lot lately and this will be a nice size for her.

The older kids had colds over Thanksgiving weekend and my mom gave them each a travel pack of tissues to carry around.  They were really excited about having their own Kleenex.  I thought a reusable tissue carrier would be something they'd both be happy to see. 

I found an online tutorial for boogie monsters and had to make them!  These little monsters use very little fabric and are very quick to sew.  I used a bow tutorial on the same website to make a little bow for the girly monster.  I think I'll add a key ring to one of the ear loops on each monster, so that the pouches can be attached to a bag, but it looked too much like they each had one earring.  So we'll wait for them to be unwrapped for that final touch.


Wednesday, October 5, 2011

Tuesday, September 27, 2011

Quick baby shower knit

I was recently invited to a baby shower and decided at the last minute to make a little hand knit as a part of my gift to the new mom.

I found this free pattern (Sweetie Pie Kit) on the Pickles website.  I'm drawn to so many of their patterns and I am sure the very cute babies in their photos helps.

This little dress and hat use the fisherman's rib.  It took me quite a while to feel comfortable with this stitch pattern, but it produces a squishy final product with lots of stretch.

I found a new yarn for this project.  Plymouth Yarn Baby Boutique is microfiber and nylon.  It has a very soft texture, a little stretch, and is machine washable.  I think the new baby will be cozy this winter with this dress over a long sleeve shirt and leggings.

Friday, August 19, 2011

Little Pink Pig!

I put the finishing touches on this little pink pig this week and mailed him off as a birthday present for one of our favorite 3 year olds.  This pig is quite cute and is knit around a bouncy ball!  We just had to try him out a few times before popping him into his box and we were squealing with laughter as he jumped around the kitchen.  (Couldn't help that pun...)

A year or two ago we got a book called Ping Pong Pig.  It's all about a little pig who wants to fly and gets into trouble jumping all over the place.  His friends get him a trampoline to keep him busy, he uses it to fix all the stuff he broke, and everyone is happy.  We sent the pig and book together - a bouncy Ping Pong to go with the book!

The pattern I used for this pig was posted for free on the Spud and Chloe blog. (Oink)  There are a lot of fun, free patterns on that blog. 

I had a difficult time sending this little guy off.  He's a perfect handful and has a nice weight due to the bouncy ball.  Adorable!


(Ravelry: Bouncy Pig!)

Friday, February 11, 2011

Handmade gifts - part 2

My list of gifts I wanted to knit just kept growing and growing this year.  I was trimming it continually, yet adding new things at the same time. 

I will include the Ravelry link for each of my projects.  If you are curious about yarn type, needle sizes, and other details you can find that information there. 

I had such a great time knitting this flap hat for J. (Free Ravelry pattern: Cozy Canuck Chullo)  I had not tried Fair Isle before and now I can't wait to try it again.  The first hat I made was too small, so I made another in a larger size and we gave the smaller hat to a baby friend.  (Ravelry: flap hat)

 R really likes the yarn I used to make her Wallaby and had requested matching mittens.  I held the yarn double and put a little heart on each.  I thought they might not keep her hands warm enough, but she has worn them outside a few times and they passed the test.  (Ravelry: mitts)

 I also knit these cute butterflies (free pattern) and attached them to ponytail holders for R.  I used the same yarn as in her Kina sweater (shown in the photo above.) (Ravelry: butterflies)

I wanted to make C a little baby sweater.  This pattern is called Little Boy Blue.  It's cozy and warm, but I don't like how much the collar and bottom edge roll.  I had intended to put I-cord along the bottom, but at this point probably won't.  I also knit her that squishy ball toy.  I had planned for a whole group of them, but ran out of time. I am almost finished with a second, slightly larger ball. (Ravelry: sweater, ball)

I decided to make R's teacher and student teacher each a scarf. The goal was to make both over our Thanksgiving vacation and I was successful.  I really like both of these patterns for quick gifts.

For the student teacher I knit a Breckenridge cowl.  This yarn was in my stash and worked well with the pattern - the cables show up much better in person. The dragonfly buttons were a last minute find and really went well with the yarn. (Ravelry: cowl)

And here is the Super-Fast, Ultra-Cozy scarf for R's teacher.  This is another free pattern and I know it is a popular pattern for gifts because it is so quick to knit.  I used Lion's Brand Homespun for this one and it turned out to be such a soft, squishy, warm scarf.  The pattern worked well with the unique texture of the yarn.  (Ravelry: SFUC scarf)

I found some gorgeous, soft alpaca yarn and wanted to make a scarf and hat for my mom. I think that this yarn was one of my favorites to knit with.  Each stitch was a new color and it felt very luxurious and dense.  The Diagonal Rib pattern (free) gave it a little texture.  I carefully immersed it in water before blocking it and it became much more open and limp.  I would have made it longer if I had known and I'm disappointed by how the pattern is no longer as striking.  It was still a cozy scarf, even with the negative surprises.  (Ravelry: alpaca scarf

I went with the free Snappy Hat pattern for a matching hat and it was off to a nice start.  Sadly, I ran out of yarn with 7 rows to go!  I need to find a new plan for this yarn, but I just adored the hat it was becoming. These photos also show how bulky the scarf would have looked before washing.  I have no idea what this yarn will become, but I need to find a good use for it!   (Ravelry: sad hat)

My latest project was for a new baby friend of ours who was born in early January.  It is the same free pattern I used for C's Welcome Home hat and booties.  I used the same supersoft yarn, but this time I knit it to the pattern specified size.  Baby gifts are so fun to knit!  (Ravelry: booties, baby hat)
Wednesday, February 2, 2011

February!

Well, January sure went by in a flash. I was kept busy with a variety of things, but I now feel like I'm getting my 2011 footing.

I had made a goal to keep track of where my time went for a week or two. I was too busy to even get that started! However I have been trying to use my time consciously, focusing more, multi-tasking less.

On the right you will see a list of crafting and food blogs that I read regularly. The blog title moves to the top of the list if it has an update.

I've mentioned How About Orange several times, including how it led me to the Calendar of the Month club. I have a little groundhog keeping me company this month. The RealSimple blog has a lot of random posts that are simliar to things found in the magazine.

I have found recipes that are now in permanent rotation on Orangette, Smitten Kitchen, and Moderate Oven. Moderate Oven is written by a friend of mine. I always wished I could sit in her kitchen and figure out how she put such good food together. Now I can! The Artisan Bread blog is connected with the awesome Artisan Bread in 5 minutes a day book. I plan to post more about that soon.

There are quite a few knitting sites in my blog reader. Yarn Harlot, Mason-Dixon knitting, and Spud & Chloe are written by published knitting-book authors. Of course they often mention knitting related things, but I find Yarn Harlot really funny, Mason-Dixon knitting often mentions all sorts of non-crafty/interesting topics, and Spud & Chloe hosts knit-a-longs and gives lots of technique advice.

French Press Knits is written by a self-published pattern designer. I really like her designs and have knit some myself. TECHknitting has awesome tips and tricks if you are someone who knits.

Nissa Nicole is my talented photographer sister-in-law. I do not personally know the ladies who write Our Yellow House and SpiderWoman Knits, but they live in upstate NY and have great craft/household/gardening ideas. Ana White designs free furniture patterns. We found the plan for our picnic table on her site and I wish we had the tools and time to build more!

As always, I have a few posts in my head that I hope to get up here soon... but until then I hope you check out some of my favorites! If you are still checking in here, what are some blogs you read for inspiration?

Monday, January 10, 2011

Handmade Christmas gifts - part 1

I enjoy making lots of gifts for the holidays. My to-do list seems to grow and grow and I always run out of time in the end. I'm still working on one of the baby's gifts. At least she's too young to know!

In my first handmade gift post I'll talk about the items I sewed. There is something so satisfying about sitting down and sewing together a gift in a night or two!

Here is the robe I made for my son's 3rd birthday. I used the same pattern to make a robe for my daughter when she turned 3. (Burda 9690) The outside is fleece and the lining is lizard print flannel. I really enjoy this pattern - it is very simple and quick.


I made our baby girl a ribbon blanket. The puppy fabric is very soft flannel. The pink square is one of the scarves I dyed. I sandwiched ribbon loops of 4 different types and heights between the front and back. This projected turned out just as I had hoped and I'm so happy with it!

Here she is enjoying it!

Last year I came across a make-your-own fort kit tutorial. I was excited to put it together this year for some friends of ours with 3 (now 4) kids.

These pictures are really dark. That is what happens when you finish the project and want to box it up right away so that it arrives on time.
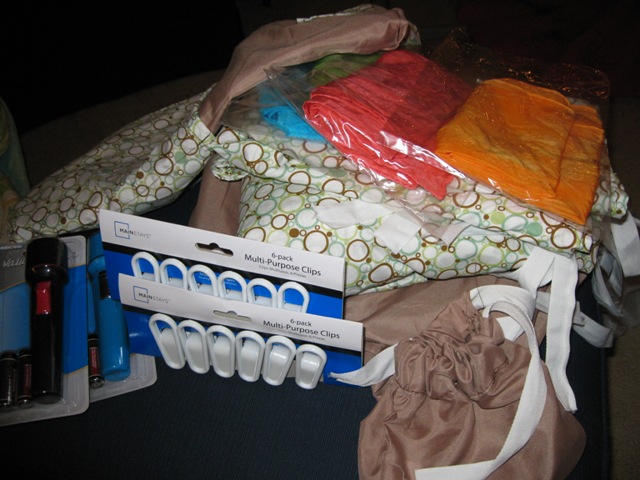
I purchased two sets of twin sheets on Black Friday and attached 6 ties to each sheet. (One in each corner and one on the middle of each long side.) I found by-the-yard twill tape for the ties and used 2 yards for each sheet. The exception was one of the fitted sheets. I tried sewing a pocket into each corner and left off the ties on the long edges. The sheets are on the bottom of the pile on the right side of the picture above.

I used the pillowcases to make two bags. A large bag with big pockets on the front and back to hold the whole kit and a smaller draw string bag for the white clips. I included 4 of the scarves I dyed, the clothespin-like clips, and 3 flashlights.
This was another project that was so fun to put together. I plan to make more of these for gifts in the future!

Thursday, January 6, 2011

Time waits for no Yeti.

We had a very busy December that ran into January and I feel like we are just getting the new year started now.

I printed and constructed this cute little Yeti this afternoon. (http://curiositygroup.com/calendarofthemonth) It makes me smile and takes the place of a very outdated photo on my desk. I'm looking forward to a super quick art project each month.

Many of my goals for 2011 can be grouped under better time management - more exercise, more effort in meal planning, more time to work and blog, more time spent focusing on one task instead of flitting here and there, time to do some organizing and decorating around the house, and so on.

My first baby goal of the year will be to take a hard look at my schedule next week. I'm going to print some blank daily calendars and fill in how I want to spend my time and where it actually goes.

I have lots of handmade gifts to post about in the next week too!

Happy New Year!

Monday, December 20, 2010

Advent 2010, Weeks 3 and 4

We are closing in on Christmas here and looking forward to celebrating with family soon.

Our Advent celebrations hit some snags last week, but we're picking up some steam now.

3rd Sunday in Advent: We had guests in town for J's birthday and didn't plan an activity for Sunday. We did have our weekly candle lighting at supper.

Monday: The task was to finish the little ornaments the kids were working on, but we got caught up doing other things and didn't get around to it.

Tuesday: Same task as Monday, since we didn't do it, but the kids decided they were not interested.

Wednesday: We were going to make homemade playdough and use it to build snowmen, but ended up doing some Christmas shopping instead. The kids were ok with that and had fun getting the gift for their dad.

Thursday: Turning the week around and getting back on track! We had a lot of fun making our own playdough. It's just flour, salt, and water! The kids played for a long time. R made snowmen and then used cookie cutters to make other shapes. J pretty much just made piles of dough. We let everything harden and now it is all sitting on our table as decoration. Definitely going to do this again!
Friday: We watched White Christmas with a picnic snack in the living room. Always a favorite!

Saturday: Rice pudding for dessert by the light of the Christmas tree. Then we read a few Christmas books out loud. I'd like this to become a tradition each year.

4th Sunday in Advent: The kids and I spent much of the afternoon baking and frosting sugar cookies. They were both excited to help! That evening we lit the 4th candle during our short supper ceremony.
Monday: Today's task was to help me wrap a few gifts. R got home early from school because of the snow and now is playing outside. We'll see if we end up doing our project today.

Tuesday: We plan to drive the kids around town after supper and look at all the house decorations.

After Tuesday I don't have any plans made. We'll be traveling at the end of the week and so maybe we'll have an activity here or there, but we'll just have to see.

I have lots of photos of various gifts I've made for Christmas this year, but we'll see if I get around to posting them before we take off!

Wednesday, December 8, 2010

Kool-aid dyed play scarves

The kids still enjoy playing with the scarves I dyed for them a few years ago. They make great costume accessories and show up in a lot of imaginary play situations.

I am including scarves in a couple gifts this year. Using Kool-aid to color inexpensive silk scarves is an easy and fun project. I've written about coloring scarves before and I followed the same instructions this time. There is quite a lot of information out on the web if you are interested in learning more about using kool-aid to dye things.

I purchase 8mm white Habotai scarves from the Dharma trading company. This year I ordered my scarves the Wednesday afternoon before Thanksgiving and they were waiting in my mailbox when we returned home on Sunday!

1) Soak the scarf in a bowl of hot water with a little vinegar for about 30 minutes.


2) Combine 2 cups cold water, 1/2 cup vinegar, and kool-aid powder. I find two packets to be plenty for good color. Use a fork to submerge the scarf and loosen any areas that are bunched up.
3) Cover the bowl with plastic wrap and microwave on high for 3 minutes.
4) After microwaving, let the bowl rest for 3 minutes.
5) Stir with the fork (being very careful when removing the plastic), cover again, and follow the heating and resting cycle twice more.

6) After 3 cycles of heating and cooling let the bowl rest until cool enough to touch. Drain the water and hang the scarf to dry.
7) Wash the scarf in cold water (I add a tiny amount of detergent), hang to dry again, and iron on low.
This isn't a very good project for the kids to help with, since the bowls do get very hot, but they enjoy watching the plastic wrap balloon up in the microwave and it is like magic to see how the water starts off a bright color and ends up clear.

Monday, November 8, 2010

What's for dinner?

Each week we plan our meals and make a shopping list. I try to mix some family favorites with a new dish or two, keeping in mind the time we have available for food prep. and cooking. Thinking of healthy, enjoyable meals can get frustrating when you have two kids who can be particular. (Hamburger on a bun, mashed potatoes - yum!, hamburger and potatoes baked in pie crust - how could I suggest such a thing?!)

We are taking a break from meal planning around here and trying Real Simple's Four-Week Dinner Plan.

The magazine gives recipes and shopping lists for 5 meals a week. I've seen similar plans before and either the meals don't seem like they'd fly around here or bizarre ingredients and preparation techniques make me roll my eyes.

But, the majority of the meals in this plan look delicious and like something we can adapt for our kids. The prep and cooking times are reasonable.

I'm looking forward to trying some new things and having it all preselected adds some fun to a tricky time of day. If the kids grumble it isn't my fault, I'm just cooking the meal of the day. We do plan to serve bread and a kid friendly veggie most nights and will make modifications here and there as it suits us. (Romain salad on the side instead of the Romain slaw on the turkey burgers, skip the dijon sauce on the steak...)

The preplanned meals give the week an element of adventure. Last night we had Tilapia baked with roasted potatoes, lemon, and olives. (bread and broccoli on the side) The kids both tried each element of the meal, were excited about it, and seemed to have an open mind.

I think we'll spend a little more on groceries, but hopefully we'll find a few new family favorites and have a vacation from meal planning for a few weeks.

- photos from Realsimple.com

Wednesday, September 8, 2010

Knitting update!

I've been working on a shrug for my daughter all summer and it is slow going. I took a break over the weekend to finish up a winter hat that I started back in May while waiting for the yarn for the shrug to arrive.

This is the Slouchy Copy Cat Hat. It was knit with Plymouth Encore left over from the first Wallaby I made. It was a nice easy pattern and the mock cable was fun. I'm looking forward to cooler Fall weather and trying it out!
A friend recently shared links to a few projects from Susan B. Anderson's itty-bitty toys book. I checked it out from the library and my gifts to knit list just grew in huge amounts. If you are on Ravelry I suggest you check out the book's link there to see some of the many cute projects. The author also has a blog that I found today and will be following.

I'm planning on making the Sisters reversible toy for sure. The author suggested trying one of the basic projects first to try out the various skills. I tried a little squishy ball and am hooked!
I'll be updating my gift ideas list on the side bar and blogging about finished projects as we get closer to the holiday season. I hope to make an item of clothing and a toy for each of my kids, plus I always find ideas for others on my gift list as well.

Tuesday, August 10, 2010

Fun with material science!

Cornstarch and water combine to form a non-Newtonian fluid. In this case, instead of having a constant viscosity, it moves like a liquid under a small amount of force and acts like a solid if a large force is applied.

It's a good excuse to make a mess and is a lot of fun to play with!
At first the kids enjoyed just getting gooey. They really noticed the response of the mixture when they dripped a bit on the counter and saw that they could smear it if they were gentle, but if they used a lot of force it held its shape. That led to a lot of goop on the counter!
Eventually the water started to evaporate from our mixture. At that point they had fun scooping the powder into the bowl again and adding water to it. They spent quite a while pouring it into different cups and smooshing it around.The kitchen was a big mess after their experimenting, but it was very easy to clean everything up. The cornstarch dissolved right off of them when it came time to wash up and the goop on the counter and floor dried very quickly and could be swept away.

We used a ratio of 1 cup cornstarch to half a cup of water.

The video I link below shows people running across a pool filled with cornstarch and water - how fun!
http://www.youtube.com/watch?v=f2XQ97XHjVw

Thursday, August 5, 2010

Food finds...

The town where I went to college had a small shop that sold Cornish pasties. It was just far enough from campus, with hours that catered to the state employees, that it was a treat to eat there. The shop had many choices for fillings, all wrapped in a flaky crust, but I always went with the same one - burger and potatoes. The pasties were absolutely huge and the leftovers were a big treat to a busy college student.

In a recent issue of Real Simple magazine I found a recipe for meat and potato pasties! I've already tried them a few times and they are very close to what I remember about pasties in college. They are easier to prepare than they look and very filling. Yum!
_________________________

Last week my husband offered to make any dessert I wanted for my birthday. I am a big fan of tiramisu, but after trying the decadent version that Buca serves I wanted to be sure we could create something as delicious.

We found a great recipe for tiramisu at Cooking for Engineers. Many recipes we found had raw eggs, which I wanted to avoid, or used substitutes for mascarpone. We wanted to be sure our tiramisu had the rich flavor we expected and were willing to splurge on the ingredients.

The recipe went together fairly quickly and tasted (and looked) amazing. Next time we might experiment with the cake element a little. The lady fingers were in the frozen section at the store and were a little too squishy.

Friday, May 21, 2010

Big kids picnic table!

A few months ago I came across the Knock-Off Wood website. It was really fun to browse her patterns for furniture that could be built at home yet still have the look of designer furniture. I had my eye on patterns for bookshelves, a coat cubby system for our entryway, or an entertainment system. All things we could use, yet I was intimidated.

Then Ana posted the plans for her bigger kid picnic table and it was the perfect mix of a good first project and something I was really motivated to have. I could picture how much fun the kids and I would have this summer on the deck with a table like that.

My husband did most of the work, but I helped out here and there. We ended up spending $34 for non-treated lumber and screws. The stain we purchased was the most expensive part, but we used very little for the table and will put most of it on the deck when we refinish it. The whole table was cut with a hand saw in less than an hour and then it was put together and stained over several nights.

It's amazingly strong and is not uncomfortable for an adult, although it is sized for kids. Yesterday I drank my coffee there, in the sunshine, while my daughter colored and my son drove his trucks around us.
We have plans to build a little plant stand with some odds and ends of lumber that we have in the garage. It's very tempting to get some nicer tools and start building other projects as well!

Wednesday, March 24, 2010

Scones, glorious scones!

I've become a big fan of baking scones in the last year or so. I think it is because you can use frozen or cold butter and don't have to think far enough ahead to soften it. But, I like the texture and process of working with scone dough. And what could go better with a cup of coffee?

Today I have Whole Wheat Apricot Scones in the oven. I tried them over the weekend while my parents were visiting and we gobbled them up. I noticed today that I had quite a bit of half and half left and it just wouldn't do for it to spoil! They are made with whole wheat pastry flour, which gives them a hearty, yet light flavor. The dried, diced apricots get warm and soft in the oven.

If you check out that link, stay a while and read Orangette's blog. A friend passed it along to me months ago and it's so well written and fun to read. She has a great caramel corn recipe that I made a few times around Christmas. And her post on polenta reminded us that we had been meaning to figure out what the fuss is all about with polenta. Based on her suggestions and some of the links she posted we tried it both as a breakfast dish and leftover and fried for supper. It was so buttery and lovely. It has definitely found a place in our rotation now.

Wednesday, March 17, 2010

Mini soda breads

R wanted to make a special treat for St. Patrick's day today. Several of my friends make Irish Soda bread in March, and I like it, but have never tried to bake it myself - I've heard it is difficult to avoid making it dry and heavy.

We did a little web searching and found a great recipe for soda bread scones at Smitten Kitten. Apparently it is "American-style" Irish soda bread, but having little soda bread experience, I wouldn't know the difference.They are delicious - crunch on the outside, fluffy and soft inside. I liked the shorter cooking time compared to one large loaf and the mini-loaves make it easier to eat. She recommends splitting each between two people and we agreed with that. We left out the raisins and caraway that she recommends. I could see these being great with jam at breakfast or with some fresh strawberries for a treat.

Once the scones were in the oven, J continued to cook with the crumbs and flour left behind. He's a cowboy chef in training!